Sunday, July 3, 2011

Souce Code Management with Tortoise Hg

Tortoise Hg is open source, source management software. With this software, user can modify the content of the file without having to rename the file. In addition, you can even see the versions of your files in graphical form. That is, how your file is being modified. I often used it to keep track my PCB layout as most of the time, once too much editing is done, the PCB layout tools will stop you from returning to the previous steps. Thus, this tool can be used not only with codes, but also with files. The method of setting up a repository and method of using it will be further discussed below:

Using TortoiseHg


Figure 1-1: Files to be added


Create a folder with the file or files to commit. Right click anywhere in the folder -> TortoiseHg -> Create Repository Here. By doing so, TortoiseHg init will be prompted as shown in Figure 1-2.


Figure 12: Setting up a repository in the folder itself


If you need to run the commit directly, select "Run Commit after init". If not, just click on create. In Figure 1-3, you can see that .hg and .hgignore has been created.


Figure 13: .hg folder and .hgignore is created


Figure 14: Adding comment and select files to commit


If you have selected "Run commit after init", then, this window will be prompt. If not, click on the file -> Right hand click -> Hg Commit. Then, this window will be prompt. Select the files to commit and press commit.


Figure 15: Files that are committed to the repository


Once the files or folder has been committed, a green tick is created on the files or folder icon.


Figure 16: Test1.doc has been modified


Any further modifications on the file will give the indication as shown in Figure 1-6.


Figure 17: update to the previous version of the file


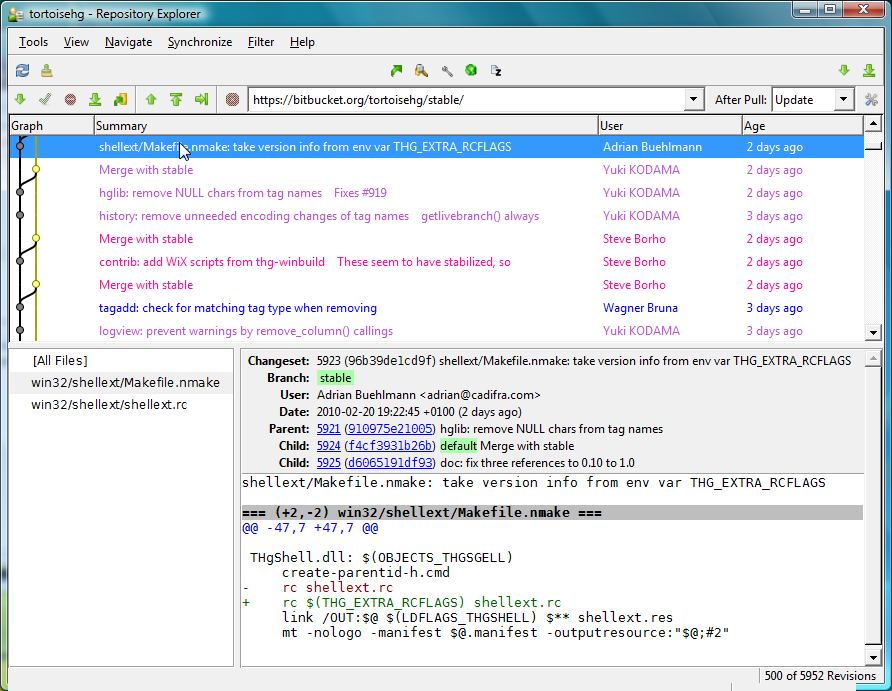
If you have modified your initial files too much and you intend to return to the last commited template, you can do so, by right click on the file -> Hg Repository Explorer -> click on the previous file, which you want to return to. Then, the window in Figure 1-7, will be prompt. After that, click update.


Figure 1-8: Shows the time the file has been modified and new v1.00 is created from the initial document file


After updating, you can edit your current documents and commit them to the repository. Once it is done, open up the Hg Repository Explorer, again by right click on the file -> Hg Repository Explorer. You should be able to see similar layout as in Figure 1-8.

Conclusion


This software is very useful to manage your source codes, as well as your files without having too many versions on the screen. Additionally, it allows the user to return to the previous files, which is limited by the undo button itself in most of the software.

Note: Remember to commit the files each time you are edit your files. Without doing so, you will not be able to return to your previous documents.

Setting up PIC oscillator


Setting up and verified the oscillator's settings are essentially important in order to determine the timing. Some functions such as ADC, timer, interrupt, I2C, SPI, USB, CAN and Serial require the oscillator to be set first as the settings of these functions depends the frequency of the oscillator. There are two modes of oscillator's settings: Primary Oscillator and Secondary oscillator. The frequency that the PIC is oscillating is usually mistaken by taking the crystal oscillator directly. Instead, the frequency should be the frequency measured at CPU or peripherals after the multiplexer.


Steps in setting up oscillator


  1. Choose the frequency that you want your PIC to run. Lower frequency will gives more power saving while higher frequency will give better performance.

  2. If Serial communication is used, survey on the best frequency for you to choose to minimize the baud rate error. This will lower the ranges of frequencies you can choose .

  3. For higher accuracy, external crystal oscillator should be used.

  4. External crystal oscillator is chosen by selecting the best combination that can be found through the settings of PLLDIV and CPUDIV.

  5. USB usually requires 48MHz. Thus, this is provided by dividing the 96MHz frequency from the PLL by 2 or 48MHz can be supplied directly through the crystal oscillator. It can also be provided by dividing the primary clock by 4. Extra registers that has to be configured are USBDIV,FSEN, and FSOC3: FSOC0

  6. Use PLLDIV and CPUDIV with HSPLL, ECPLL, XTPLL, ECPIO or XT, HS EC and ECIO to get to the intended frequency as close as possible.

  7. A simple LED toggling code is used to verify the CPU frequency.


Examples using different compilers


  1. MCC18


Information of definitions of the oscillator registers can be found in the PIC header files or directly in MPLAB.


This setting uses external crystal oscillator directly.


Sample LED toggling programme based on MCC18


  1. HiTech C


Information of definitions of the oscillator registers can be found in the PIC header files.


The same configuration setting as shown using MCC18


Sample LED toggling program based on HiTech C


Figure 01: Sample programme based on HiTech C


Conclusion


Setting oscillator settings of any microcontroller is very important to ensure that our programs running correctly. Here, PIC18F4550 is chosen as an example but the settings of most microcontrollers are the same.

Using Oshonsoft to simulate PIC18 circuits

Oshonsoft is software used to simulate PIC microcontrollers. Here, Oshonsoft PIC18 IDE is used. This software has a lot of peripheral that developers can use to simulate their system under Tools.


Figure 1: Oshonsoft PIC18 IDE interface

The settings


  1. Set the clock frequency by: double clicking on the 20MHz. Then, Figure 2 will be shown. Here, input your desired frequency and click ok.


Figure 2: Setting of clock frequency of PIC18F


  1. Next, set the PIC18F series to be simulated by clicking on the PIC18F series after microcontroller.


Figure 3: Selecting PIC18F model


  1. Before loading the program for simulation, set the speed of simulation : Rate -> Ultimate (for fastest simulation) .

  2. To load the program, File -> Load Program


Figure 4: Simulating with different speed


  1. In tools, you can bring out the peripherals you need that are in your system to simulate it virtually.


Figure 5: Peripheral tools and instruments that are provided


  1. Options allow you to tweak the peripherals, IDE layout, and the microcontroller to meet the specification of the hardware parts that will be used.


Figure 6: Changing the settings for peripherals, IDE and other schemes

Example


Using PIC18F Oshonsoft IDE Simulator, a program to light up an LED at PORTD,0 when a logic 1 is detected at PORTE,1 .


Figure 7: Example to detect a logic 1

Tuesday, December 14, 2010

Loop the loops

There are a few common loops that is used in C: while loop, do while loop and for loop.

while loop:

while (1)

{

};

The while loop above is an infinite loop.

for loop:

for (condition = 0; condition < set value; condition ++)

{

}

This loop is suppose to count up until it meet the condition meet the set value. To make a count down loop, set condition to a value, and as long as the condition > set value, condition -- .

Do while loop:

do

{

}while(condition != 0);

This loop will do at least once to check the condition is met or not. If the condition is not met, the program will exit. The while loop and for loop on the other hand, will check whether the condition is net before executing the program.

Tortoise SVN

Another great software for source code management for window users.

http://tortoisesvn.tigris.org/

Tortoise Hg

Tortoise Hg is one of the source code management software to manage all the changes and modification done on your codes without having fear that the code has been wrongly modified and unrecovered. With tortoise, you can trace back the modfications that has been done to the codes, if you commit to the repository when each changes has been done.


Steps to use tortoise:

1. Configure tortoise setting by: Global settings -> tortoise hg -> commit -> enter user name

2. Initiate repository, that is which files/folders/source codes that needs back up

3. Add files to the repository

4. Commit when changes is done.

5.Use the Hg Repository Explorer in the folder the the files is commited to view all the changes done to the file.

Tortoise Hg is open source:     http://tortoisehg.bitbucket.org/

Microchip is coming up with MPLAB X

MPLAB X is the nex generation of MPLAB, netbean based, which have the similar look of eclipse with features: CVS, Subversion and Mercurial for source code management. Other features include: easy function viewer, linking between modules as well as autocomplete keywords :)

Downside:

Those who have not used eclipse before, need to familiarize themselves with the new outlook of MPLAB X.

To get your MPLAB X Beta to try it out: http://ww1.microchip.com/downloads/mplab/X_Beta/index.html